How to export a CSV file
Note:
-Please make sure to export your data to a CSV file.
-Before you export your data from your browsers or other password tools, please temporarily turn off any backup software you may be using, so the unencrypted export file will not be backed up. Then follow the steps below:
Export your saved logins from browsers
From Chrome
-Click the Chrome menu  in the toolbar and choose Settings Click Autofill > Passwords
-Click the More Actions icon  and select “Export passwords” ( Enter the password you use to log in to your computer if asked)
-Save the file to your desktop
From Firefox
-Click the Firefox menu  in the toolbar and choose Passwords
- Click  in the top right and select Export Logins
- Click Export (Enter the password you use to log in to your computer if asked)
- Save the file to your desktop
From Edge
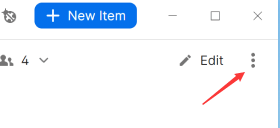
-Click on the menu button  to go to Settings
-Click the Passwords
-Click on the three dots icon on the right side of Save Passwords and choose Export passwords (Enter the password you use to log in to your computer if asked)
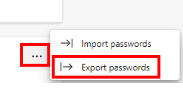
-Save the CSV file to your device
From Safari
-Open Safari and choose Safari > Preferences
-Click the Passwords icon, then enter the password you use to log in to your computer
-Click  and choose Export Passwords
-Save the file to your desktop
Export your data from other password tools to a CSV file
From 1Password
-Open and unlock 1Password
-Click the option icon, choose Export, and select the account you want to export
-Enter your account password
-Choose CSV format and click Export Data
-Choose where you want to export your 1Password data and click Open
From LastPass
-Open your browser and sign in to your account on LastPass.com
-Click Advanced Options in the sidebar, then choose Export. LastPass will send you an email
-In the email you received from LastPass, click “Continue export”
-Return to your account on LastPass.com
-Click Advanced Options, choose Export, and enter your LastPass password.
-The CSV file will be saved to your computer
From Dashlane
-Open your browser and sign in to your account on Dashlane.com
-Click My account in the sidebar, then choose Export Data > Export to CSV
-A .zip file will be saved to your computer
From Bitwarden
To export your personal data from a browser extension:
-Open the  Settings tab
-Scroll down to the Tools section and select the Export Vault option
-On the Export Vault view, choose the csv format
- Enter your Master Password and select Submit
To export your personal data from a desktop app:
-From the menu bar, navigate to File → Export Vault
-In the Export Vault window, choose the csv format
-Enter your Master Password and select the Download button
From Nordpass
-Open the NordPass application
-Go to Settings and scroll down a bit to the Import and Export section

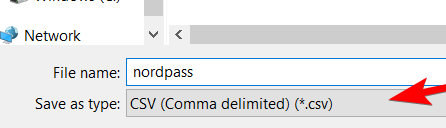
-Enter your Master Password and click Continue
-Save this file to your device. Make sure that you save this file as CSV
From RoboForm
-Click the RoboForm icon  in the notification area and choose Options.
Enter your RoboForm Master Password if asked
- Click Account & Data in the sidebar, then click Export and select:
Data to export
Location (a file on your desktop)
Format: CSV file
-Click Export to save the file to your desktop
From KeePassX
-Open KeePassX and unlock your database
-Choose Database > Export to CSV File
-Enter a file name and set the location to your desktop
-Click Save
If you have multiple databases, repeat these steps for each database.


