About iTop Screen Recorder
iTop Screen Recorder is an all-in-one screen recorder, video editor, and screenshot tool. It helps capture anything on your PC screen to make a high-quality video file or screenshot, as well as edit the recorded videos and local videos to make them stunning.
The following guide will help you get familiar with iTop Screen Recorder quickly.
System Requirements
Operating Systems Supported
Windows 11/10/8.1/8/7
Hardware Requirements
1 GHz processor or faster processor
2 GB of RAM
1,000 MB of free hard disk space
1024*768 screen resolution and above
Download and Installation
1) Click here to download the latest iTop Screen Recorder.
2) Double-click the downloaded itop-screen-recorder-setup.exe to start the installation. Then follow the on-screen instructions to complete the installation.
Uninstall
You can uninstall iTop Screen Recorder by following the Uninstall Instruction.
Updates
Pro version users can always enjoy the latest version automatically with Update automatically option ticked by default in Settings.
Free version users can manually update iTop Screen Recorder as below:
Click  at the top left of the main screen and select Check for Updates to update.
Activation
Note: A valid license code is required to activate the Pro version. If you do not have a license code, you can click here to purchase a new one.
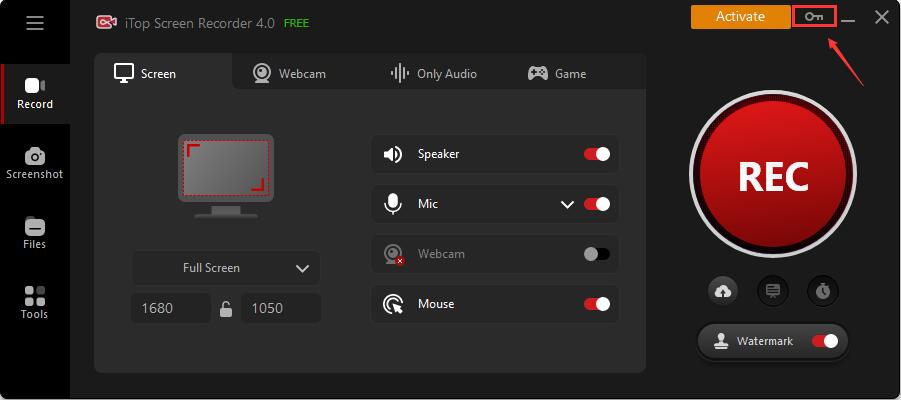
Click the Register key icon  at the top right corner of iTop Screen Recorder main screen, enter your license code, and click the Register button to activate the Pro version. Visit here for step-by-step activation instructions.
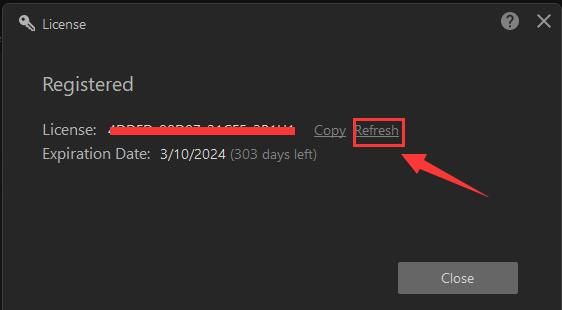
License - After upgrading to the Pro version, you can click License under Options to check the detailed license information, Fresh or Copy your license.
Record Screen/Video
Click the Record tab on the left panel, and you can see 4 main record features including Screen, Webcam, Only Audio, and Game. Screen record mode allows you to record everything on your PC.
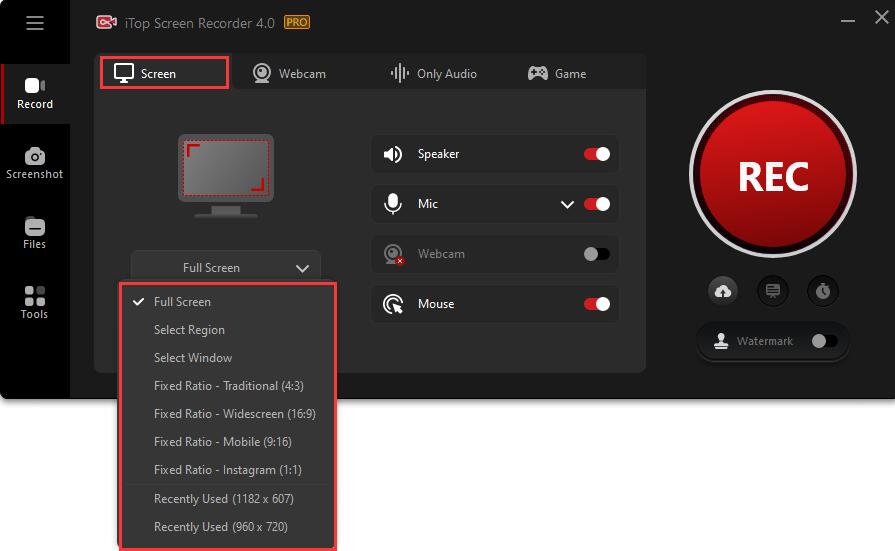
Step 1: Select the region to record it into a video.
By clicking the drop-down arrow beside Full Screen, there are various recording types to choose from: Full Screen, Select Region, Select Window, some commonly used Fixed Ratios, and Recently Used.
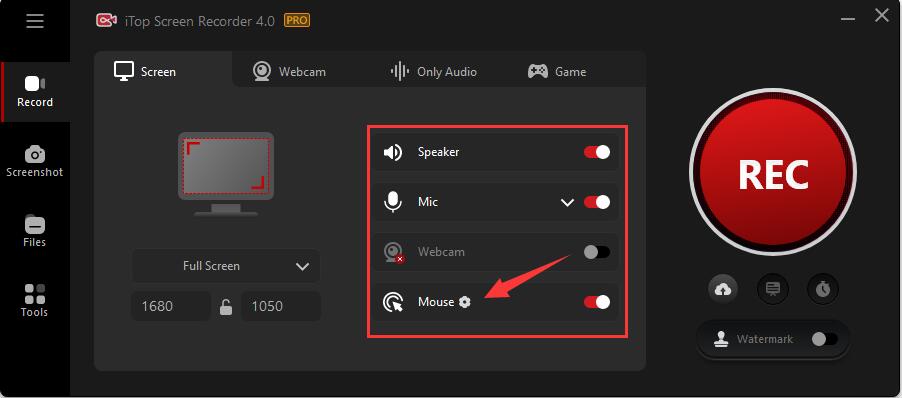
Step 2: Set whether to record Speaker, Microphone, Webcam, and Mouse together with your video by clicking the On/Off .
If you see red "x" for some features, it means you don't have the related devices installed or connected to your computer.
You can also click the Settings button to set your mouse effects here.
Step 3: Click REC to start the recording.
It will start recording after counting down 3 seconds by default. You can remove the countdown timer in Settings or press the preset hotkeys to quickly start/pause/resume/stop recording.
Step 4: Click the Done button  or press F9 (default hotkey) to complete the recording.
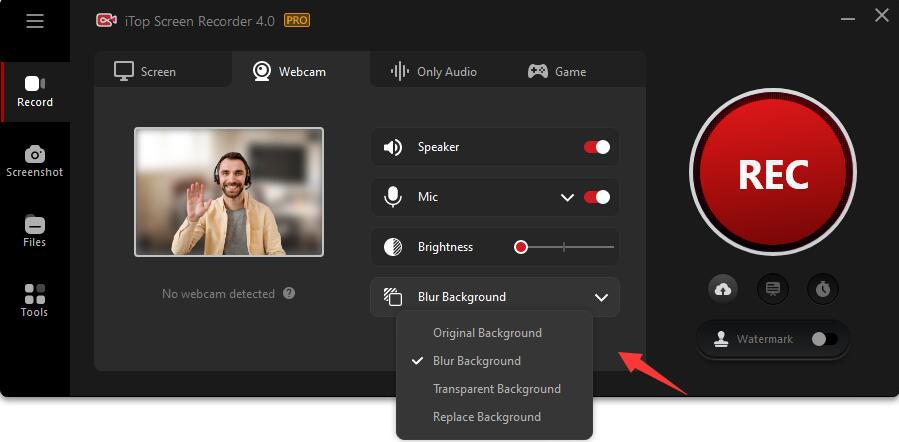
Record Webcam
iTop Screen Recorder allows you to record webcam only or together with your other contents as per your needs.
Step 1: Click Webcam tab in the Record screen.
Step 2: Configure your settings for webcam recording including Speaker, Mic, Brightneess, and Background.
Note: You can set webcam frame shape under Wecam in Settings.
Step 3: Click REC to start the recording.
Clicking REC under Webcam tab will only record the webcam window. When you start to record under Screen, it will record the selected region and webcam together.
Step 4: Click the Done button to complete the recording.
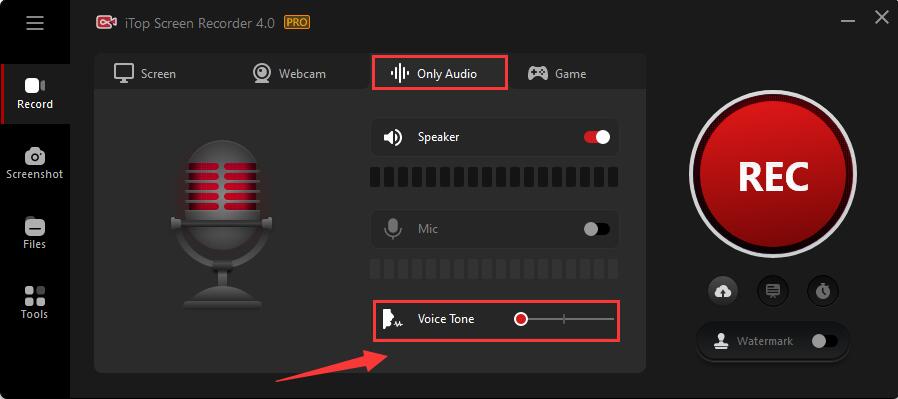
Record Only Audio
When you need to record a separate audio file for music or your voice, you can try Only Audio recording.
Step 1: Click Only Audio tab in the Record screen.
Step 2: Configure the settings for Speaker, Mic, and Voice Tone as picture below:
Note: Voice Tone can help you change the voice.
Step 3: Click the red REC button to start audio recording.
Step 4: Click the Done button to finish the recording.
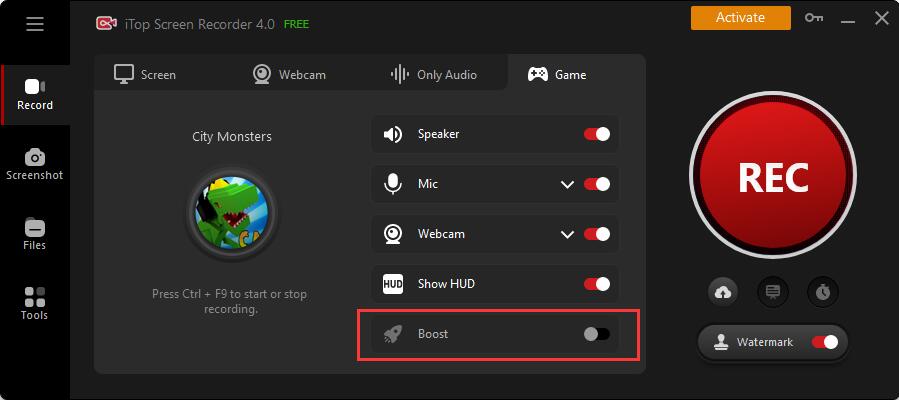
Record Game
Game recording helps record gameplay without lag and display the FPS while the recording is in progress.
Step 1: Click Game tab in the Record screen.
Step 2: Set the settings for Speaker, Microphone, Webcam, HUD, and Boost as per your needs.
Note: Boost can help optimize your system and hardware for smoother game recording.
Step 3: Play the game you want to record and then click the red REC button to start the recording.
If your game was not detected automatically, please click the add icon to add the game manually and start your game recording.
Step 4: Click the Done button to finish the recording.
Cloud Storage
After recording, you will get a popup by default to upload the recorded files to Cloud for easier management and sharing anywhere anytime. Or you can upload the recorded files to Cloud under Files or visit the Cloud storage in the main screen under REC.
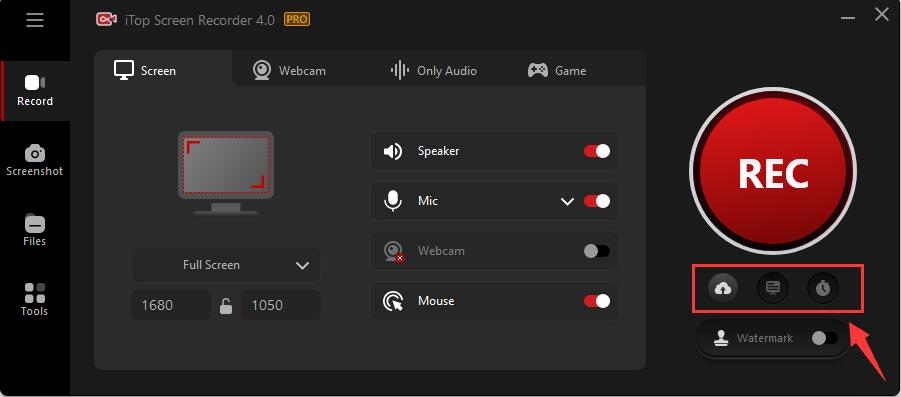
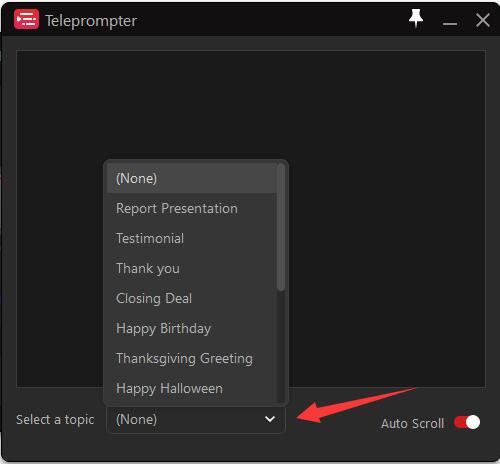
Teleprompter
It enables you to make your explainer videos more efficiently with prewritten scripts.
Step 1: Click Teleprompter icon under REC.
Step 2: Select a prewritten script for your recording or edit your personal script.
Recording Schedule
You can automatically start recording at a specific time on a daily/weekly schedule or run an Auto-ending Recording as per your needs.
Step 1: Click Recording Schedule icon under REC.
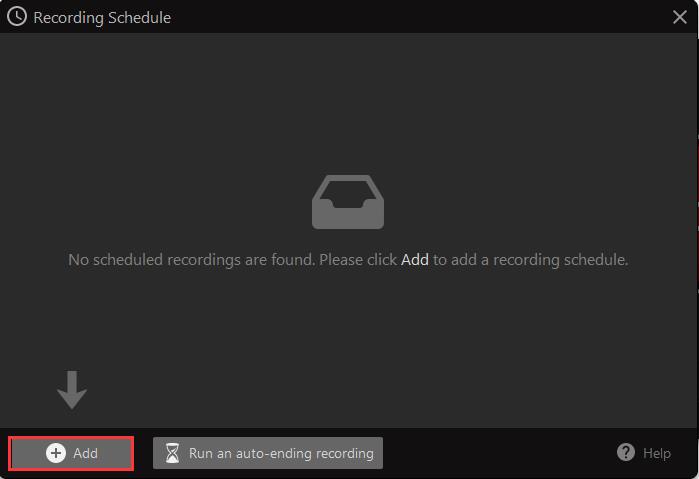
Step 2: Click the Add button to create your recording schedule with its name, start and end time, record region, and what you want your PC to do after the scheduled recording.
Note: You can set to Do nothing, Sleep PC, or Shut down PC after performing the scheduled recording.
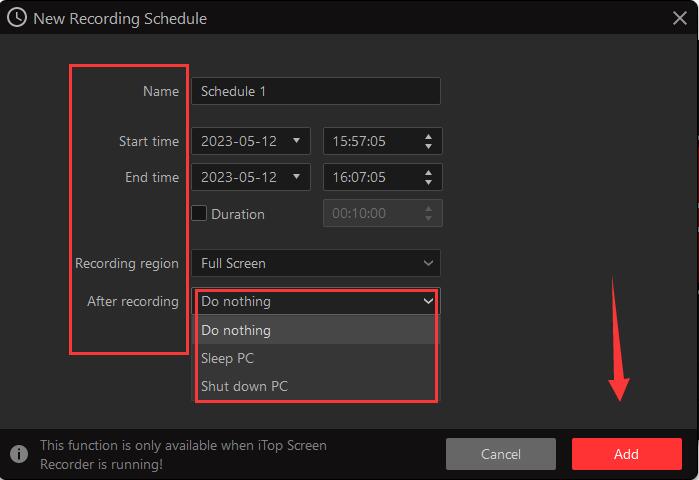
Step 3: Click the red Add button to apply the settings finally.
Run an Auto-ending Recording
Step 1: Click Recording Schedule icon under REC.
Step 2: Click Run an auto-ending recording and set the recording duration, recording region, and what you want your PC to do after the scheduled recording.
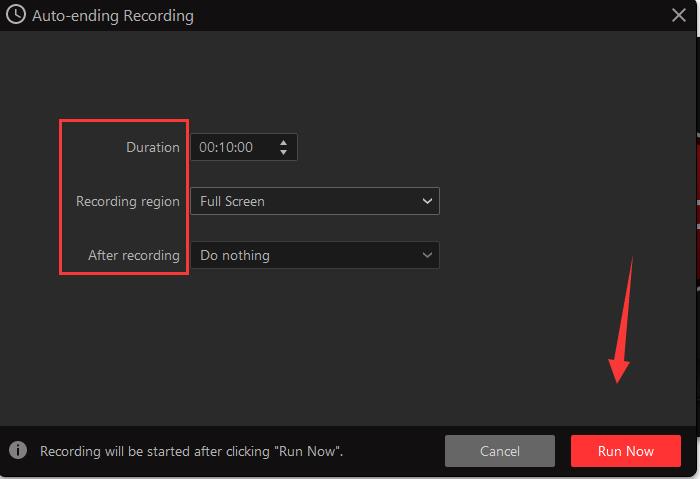
Step 3: Click Run Now to start an auto-ending recording.
Note: Recording Schedule is only available to Pro version users.
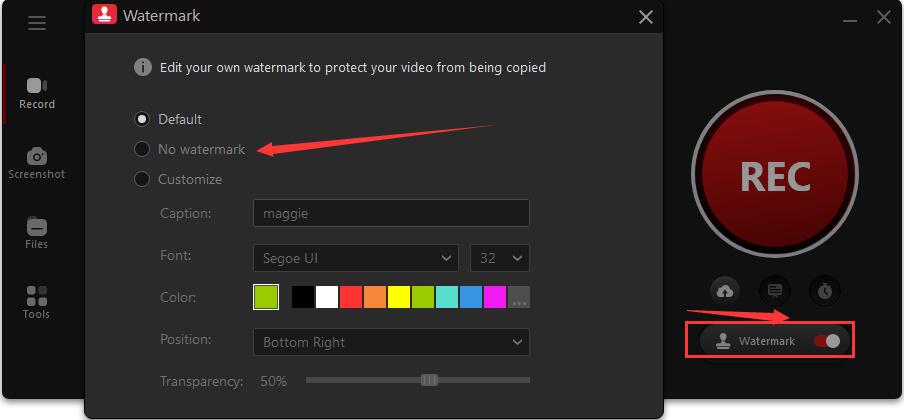
Watermark
To protect your videos from being copied, it allows you to customize your own watermark for your videos. You can click the On/Off switch of Watermark under REC to customize your watermark or record without watermark.
Note: The features No watermark and Customize are only available to Pro version users.
Customize Screenshot
Click the Screenshot tab on the left panel, and it will display the 4 main screenshot features Customize, Full Screen, Active Windows, and Scrolling Window to meet your daily screenshot requirements. Customize screnshot allows you to take screenshots for any selected region.
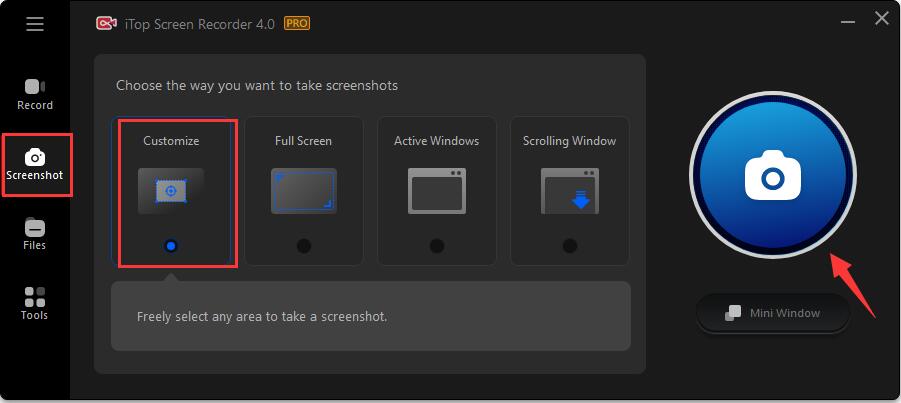
Step 1: Click Customize.
Step 2: Click the blue Screenshot icon on the right screen.
Step 3: Select the region you want to take a screenshot.
Step 4: Add necessary annotations to your screenshot and click Save to save your screenshot.

Full Screen Screenshot
You can click Full Screen and click the blue Screenshot icon or use the default hotkey F11 to take a full screen screenshot easily.
Active Windows Screenshot
You can captue the current active window with just one click.
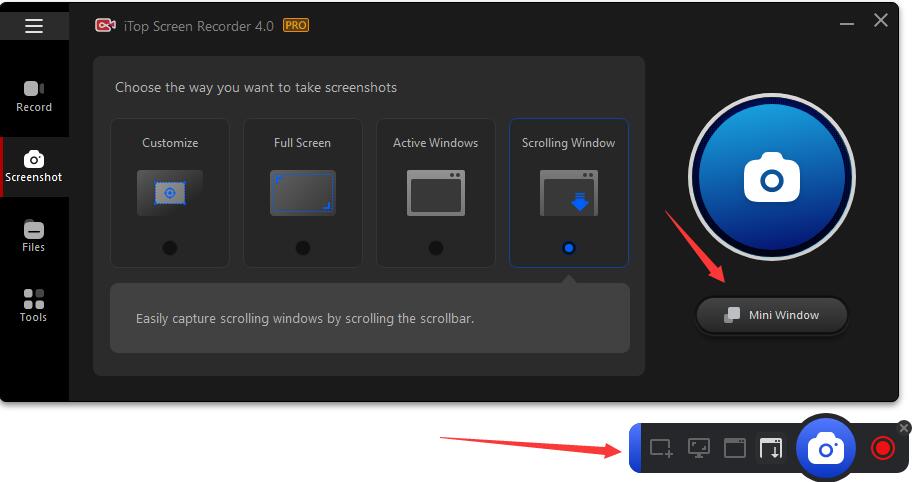
Scrolling Window Screenshot
To capture a scrolling window, please take the steps as below:
Step 1: Click Scrolling Window.
Step 2: Click the blue Screenshot icon.
Step 3: Click on the region you are going to capture and then slide the mouse scroll to select and capture the scrolling window.
Step 4: Click Save to save the scrolling window.
You can pin the screenshot on the desktop, share the screenshot to Facebook, Twitter, Pinterest & Imgur,or search similar images on Google.
Mini Window: Click Mini Window under the Screenshot button to create a mini window on your desktop to take screenshots more easily.
Video files
Click Files on the left panel of the main screen, and you can see Video, Audio, and Screenshot. Click the corresponding tab, then you can find & manage the recorded files and screenshot files here.
At the top right corner, you can see the following 4 icons: Cloud, Open File Location, Refresh, and Order by (which can order your recording files by its recording time, duration, name, and file size.)
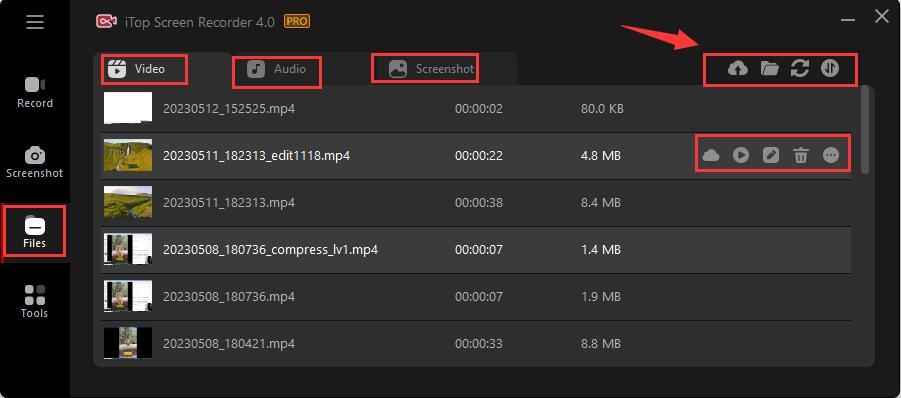
When you move your mouse to each recorded video, you can see the following icons:
 : click to upload and manage your recorded files on Cloud.
 : click to play the video.
 : click to edit your video by Quick Editor or Advanced Editor directly.
 : click to delete the recorded video directly.
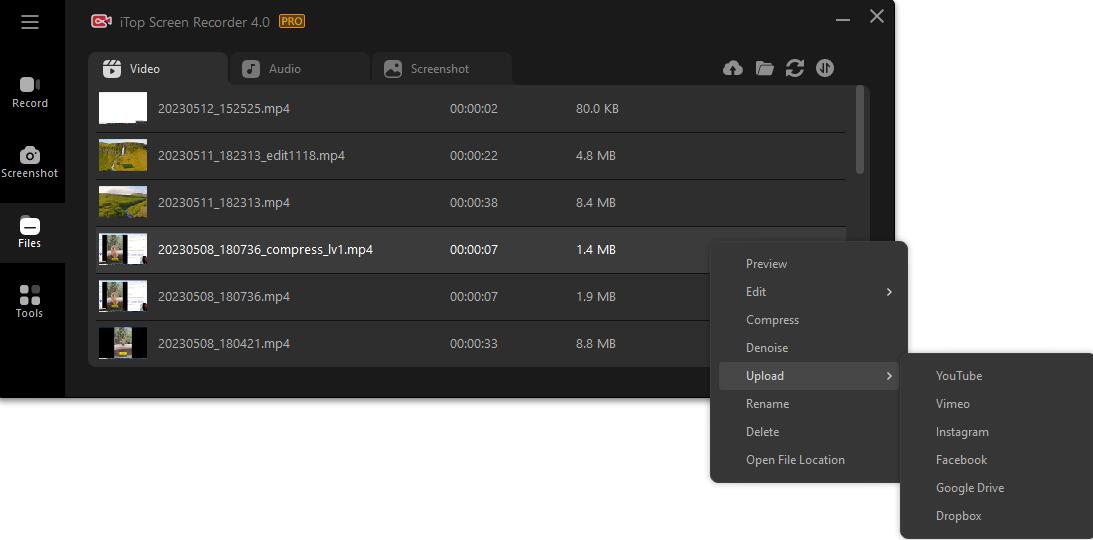
 : click to preview, edit, compress, denoise, upload, rename, delete, and open file location.
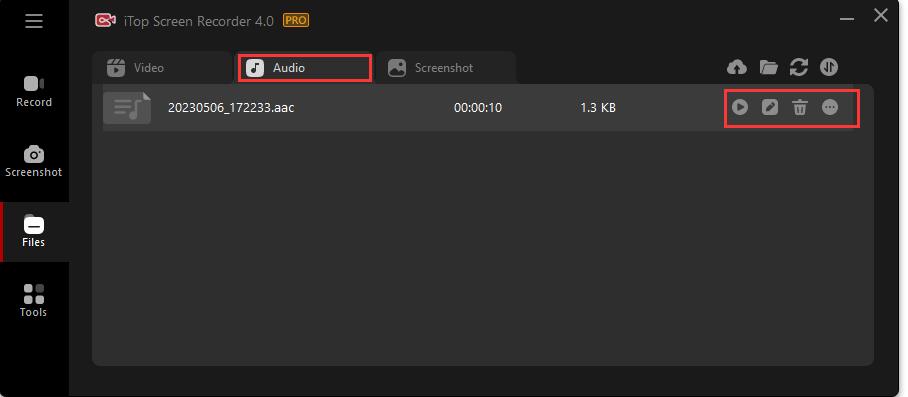
Audio files
Click Audio under Files, and you can see all your recorded audio files here. It has similar options like your Video files but there is no Cloud for audio files.
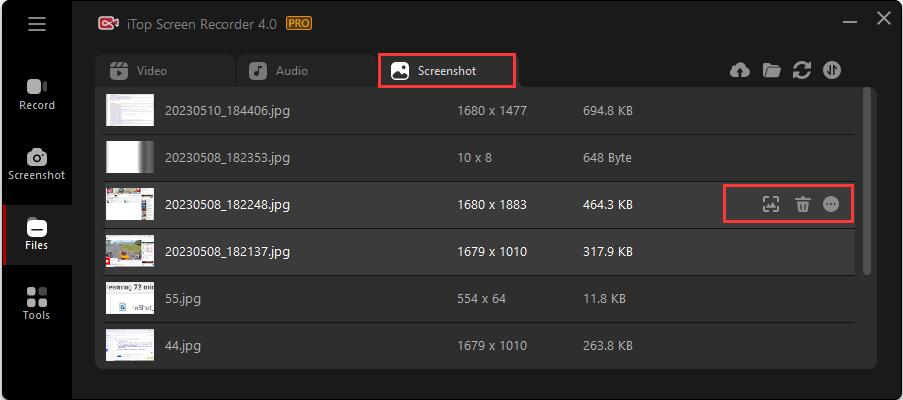
Screenshot files
Click Screenshot under Files, and you can see all your screenshot files here. You can preview, delete, rename or share your screenshot here.
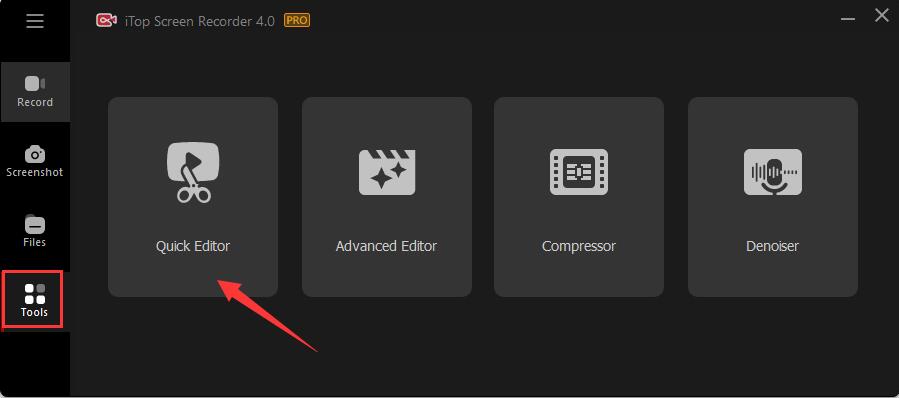
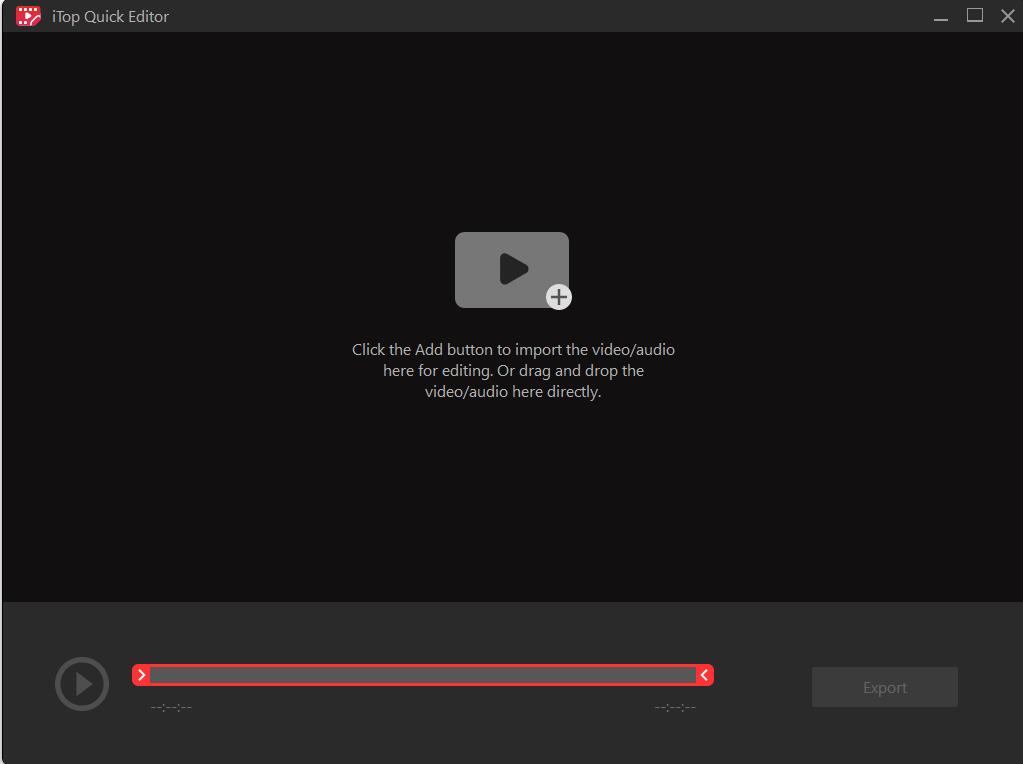
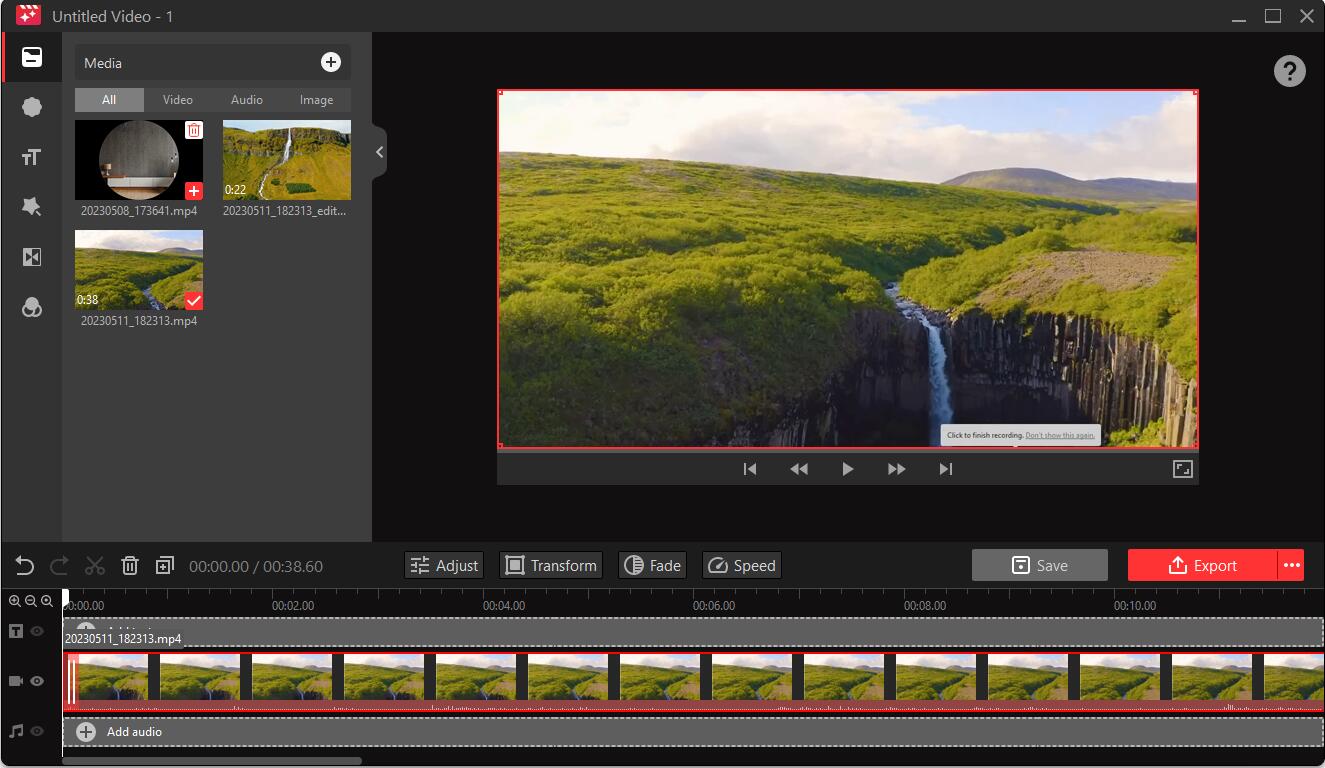
Quick Editor
iTop Screen Recorder provides 2 video editor tools (Quick Editor and Advanced Editor) to meet different users' needs. Quick Editor allows you to edit videos quickly and easily with basic features.
Step 1: Click Tools in the main screen and click Quick Editor icon to open the quick editor.
Step 2: Click the Add icon to add videos or drag and drop your videos here.
Step 3: Drag the red sliding bar to trim your video and add filters, stickers, BGM, subtitles, etc.
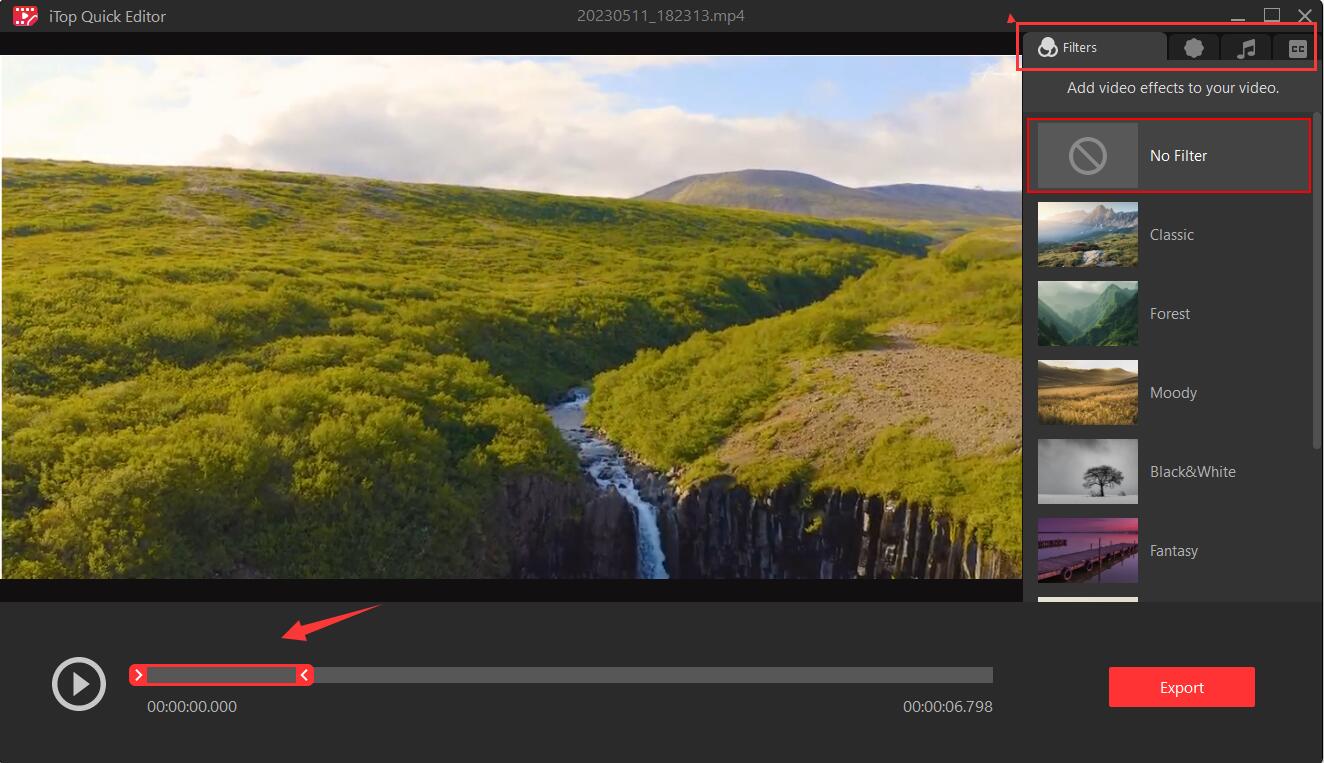
Step 4: Click Export to export the edited video.
Advanced Editor
To make your video more attractive, Advanced Editor adds more professional editing features. After clicking Advanced Editor under Tools tab, you can see options: Start a new creation to edit a new media, or Open an existing one to continue your previous unfinished editing. Let's take "Start a new creation" for example to get familiar with how the Video Editor works.
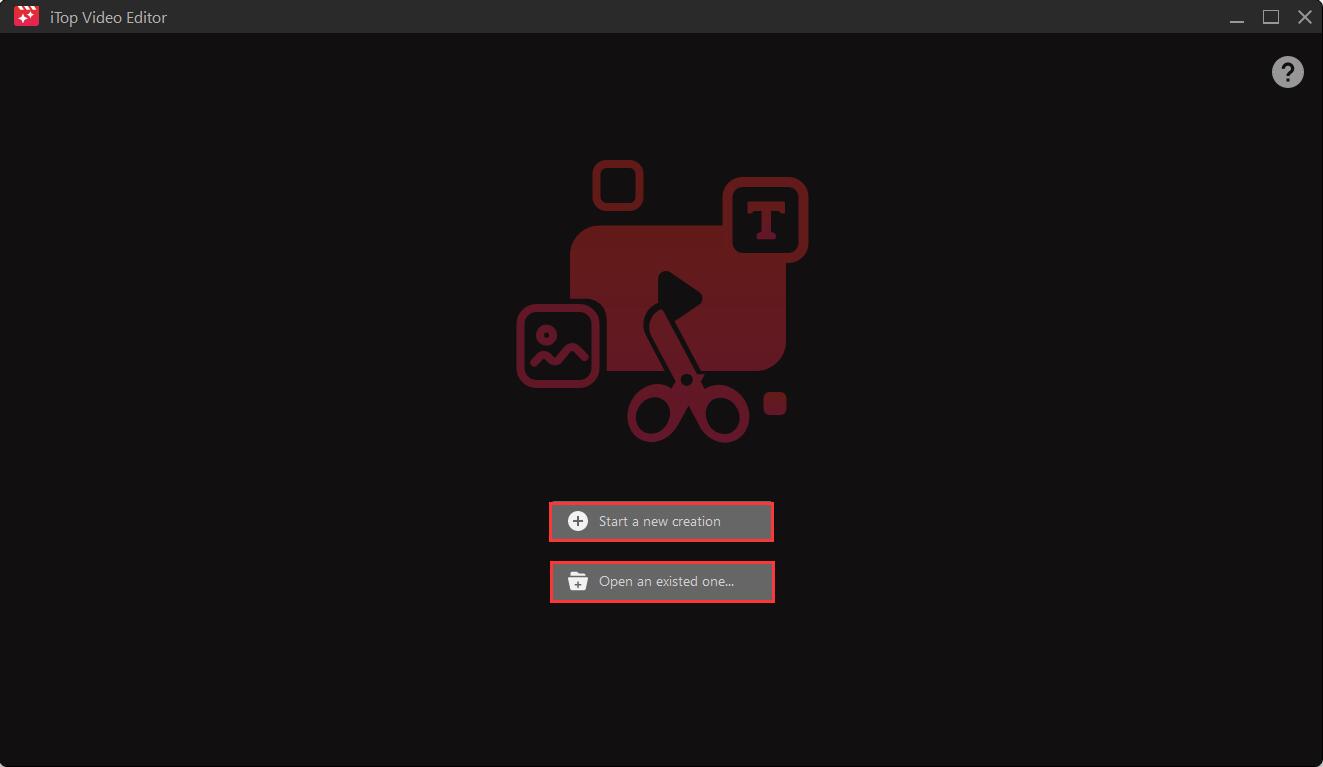
Step 1: Click Start a new creation to enter the edit screen as below.
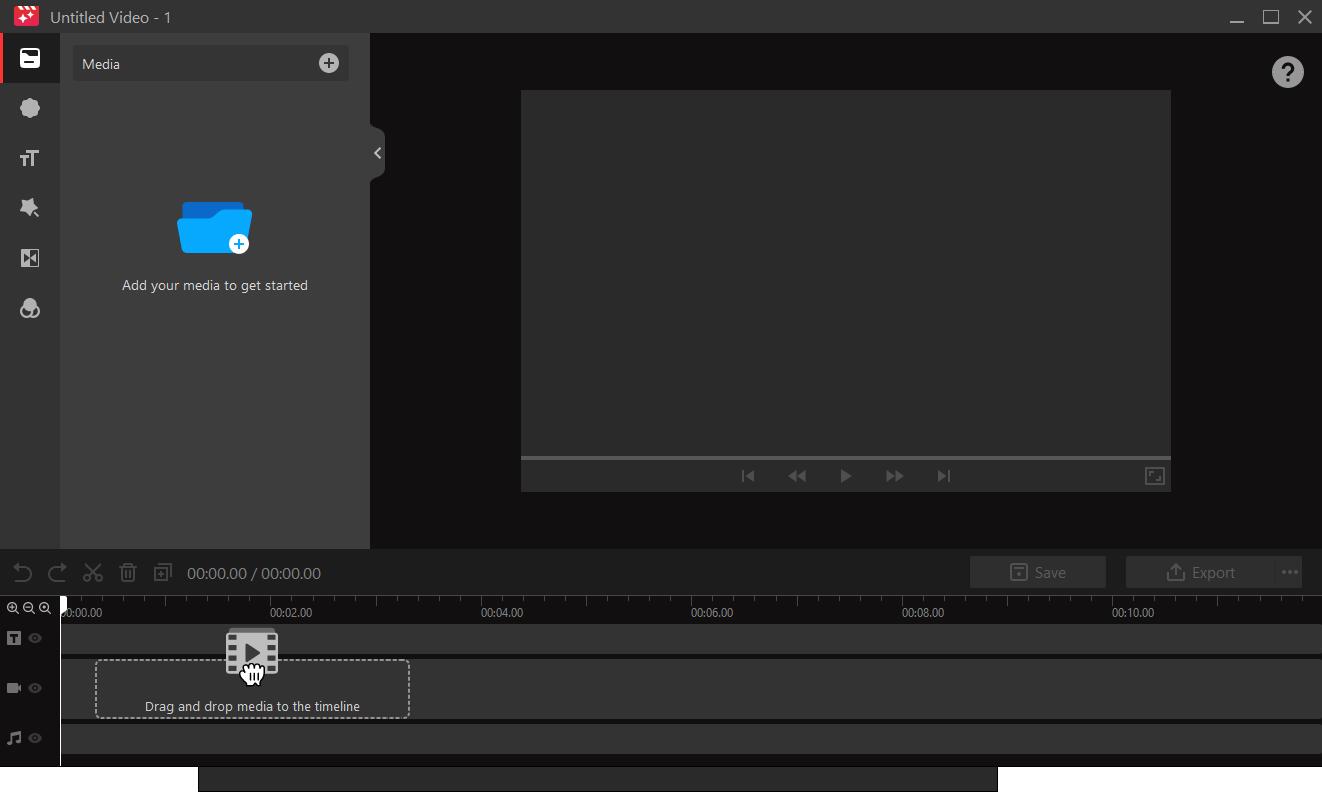
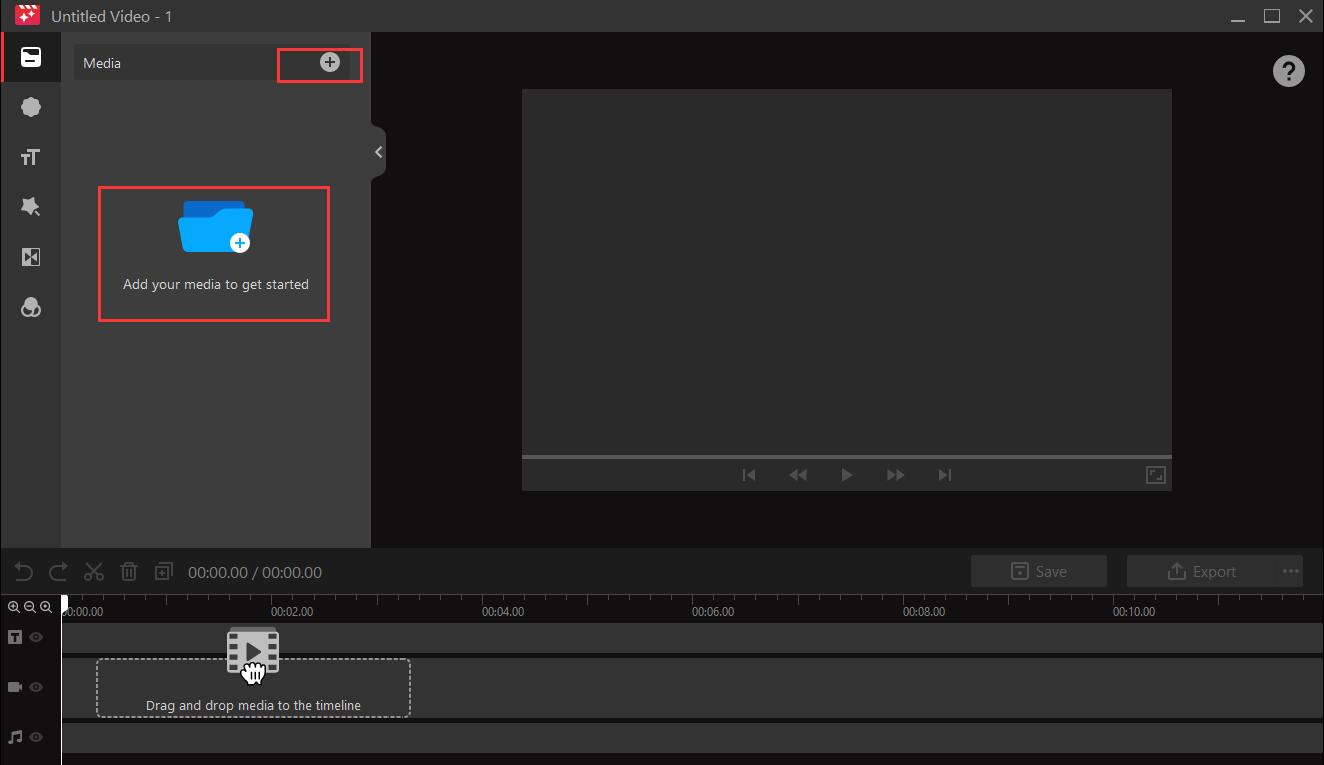
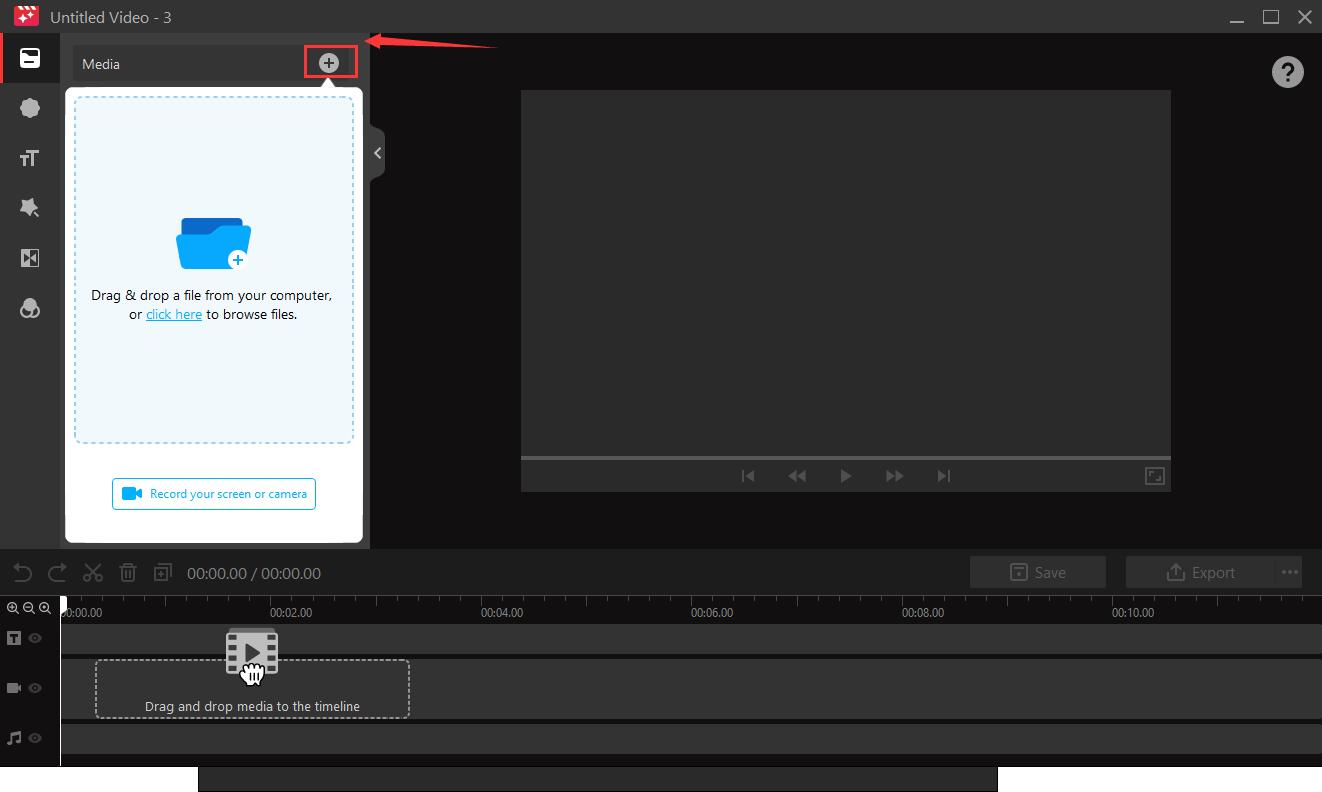
Step 2: Add media to the library.
You can click the add icon  to add the media (hover your mouse on the plus icon
  to get the adding window when you already added one or more videos) or drag & drop the media here for editing.
After adding media, your video editor should look like below.
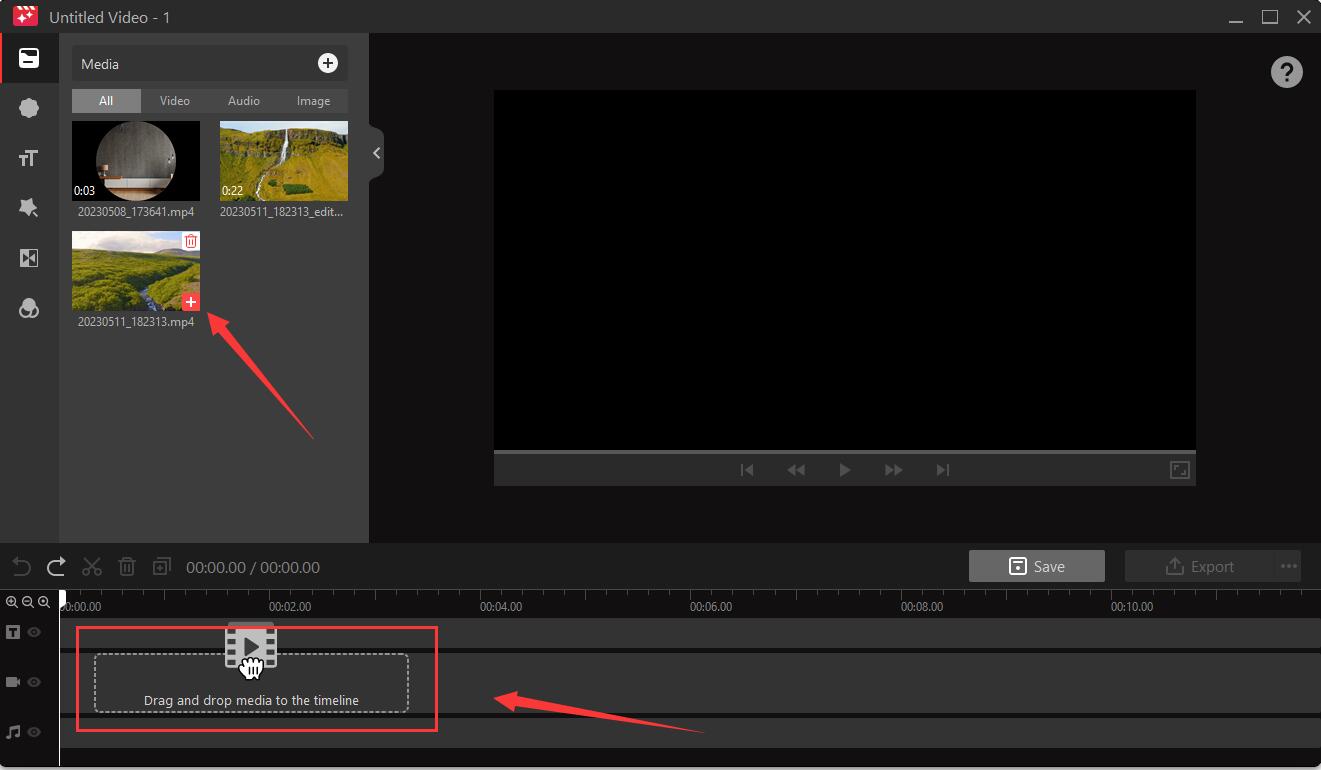
Step3: Add media to your timeline to start editing.
You can click  (Add to timeline) at the right corner of the video or drag and drop the video to the timeline.
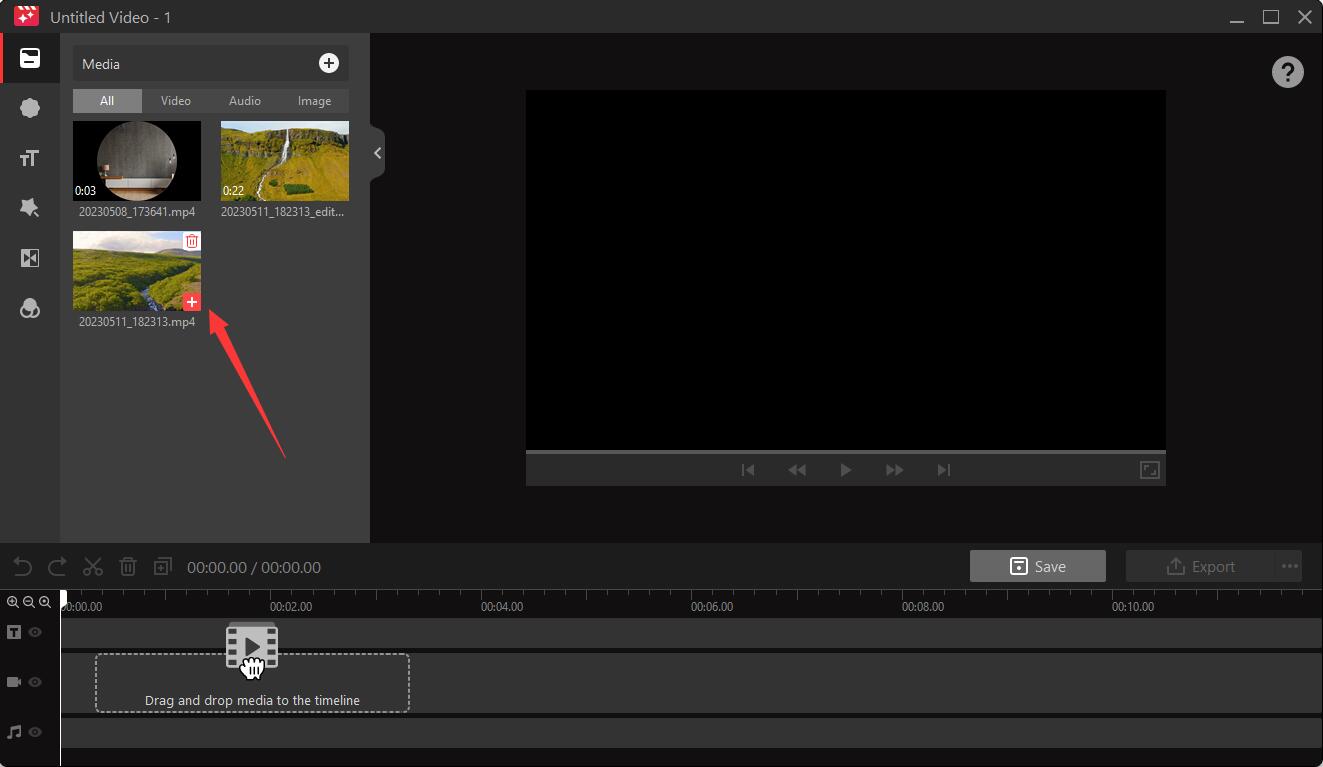
After adding media to the timeline, your video editor should look like below.
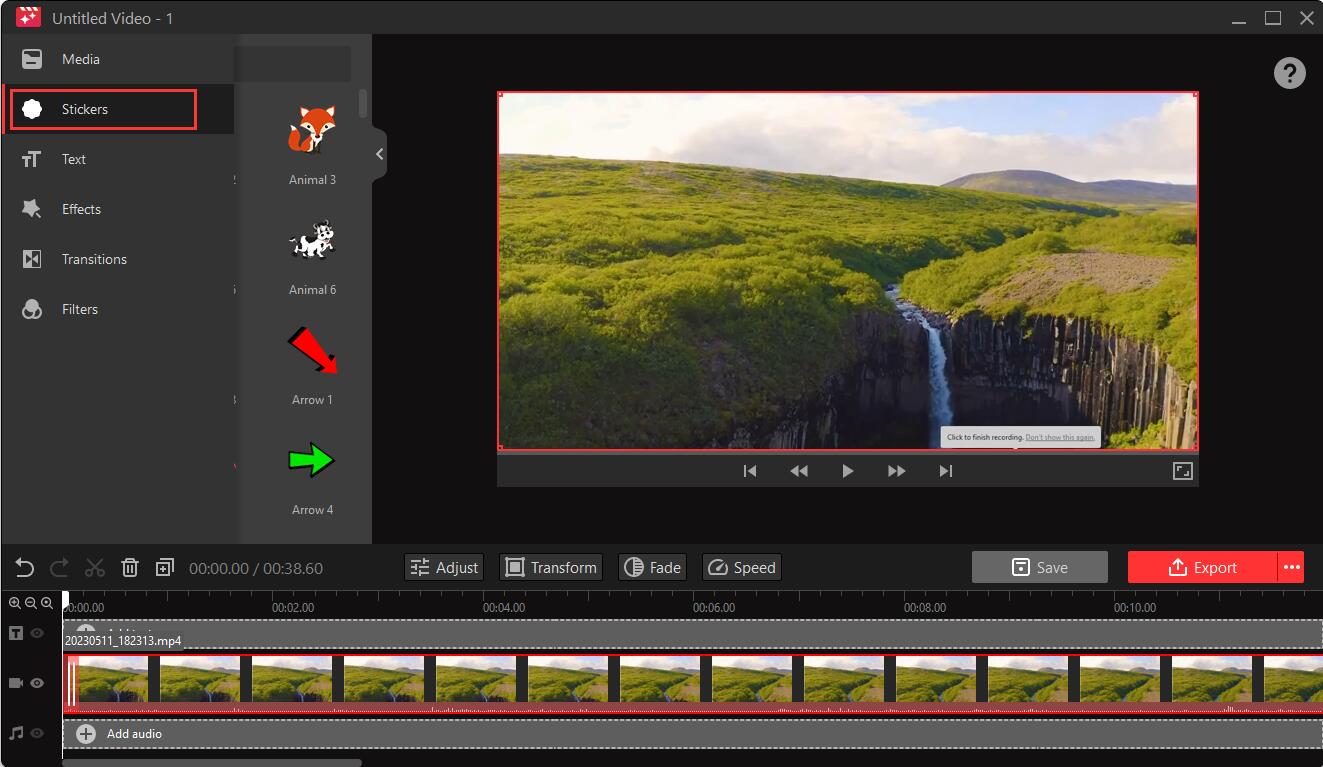
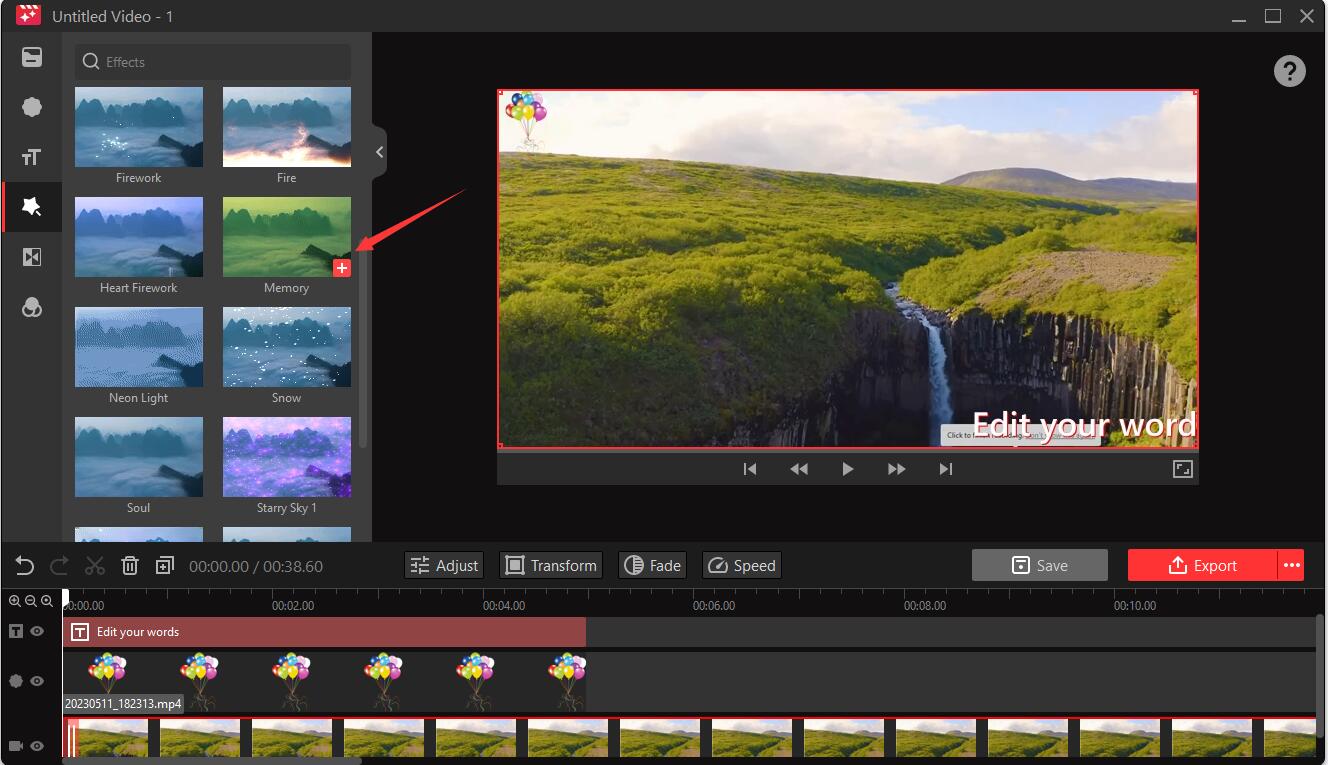
Step 4: Edit your videos by adding Stickers, Text, Effects, Transitions, Filters, music, etc.
How to add stickers to your videos?
1. Click the stickers icon on the left panel.
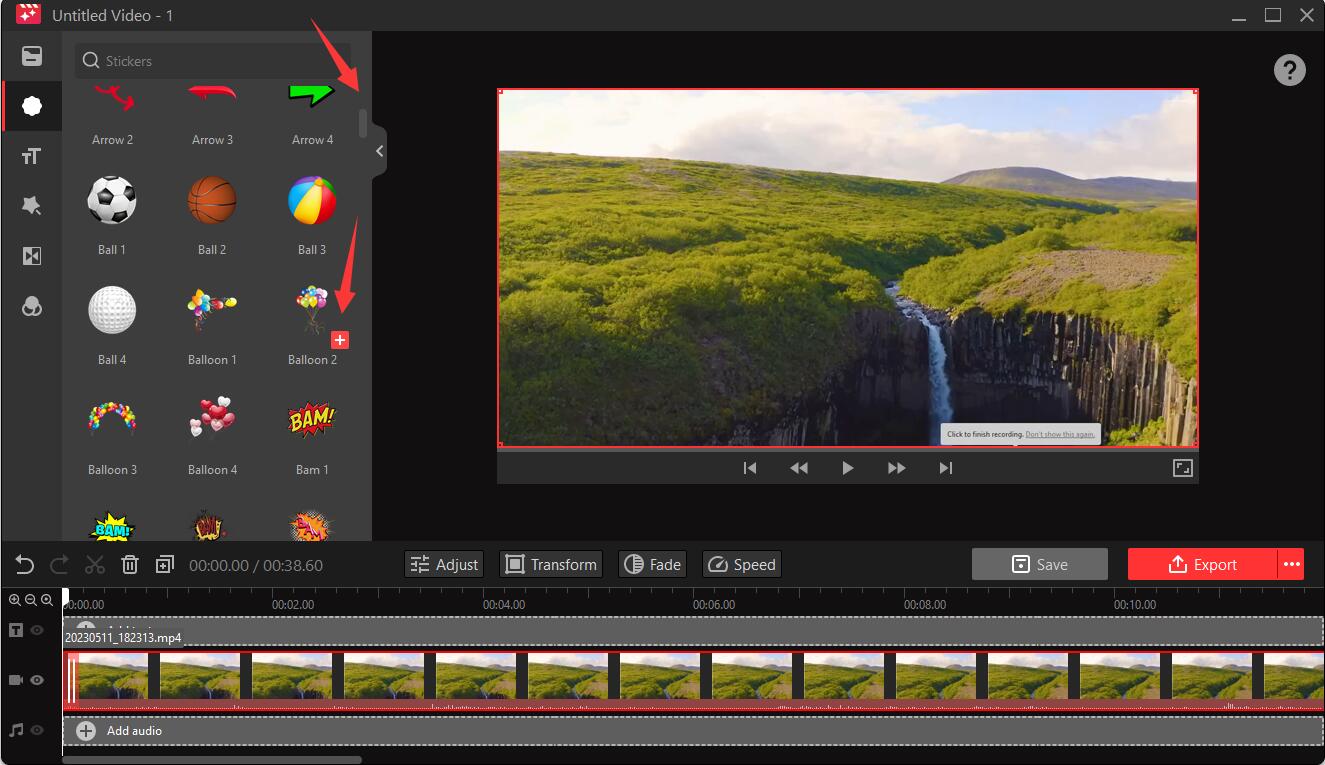
2. Scroll the sliding bar to choose the stickers you want to add and click (Add to timeline)or drag and drop the stickers to add it to the video.
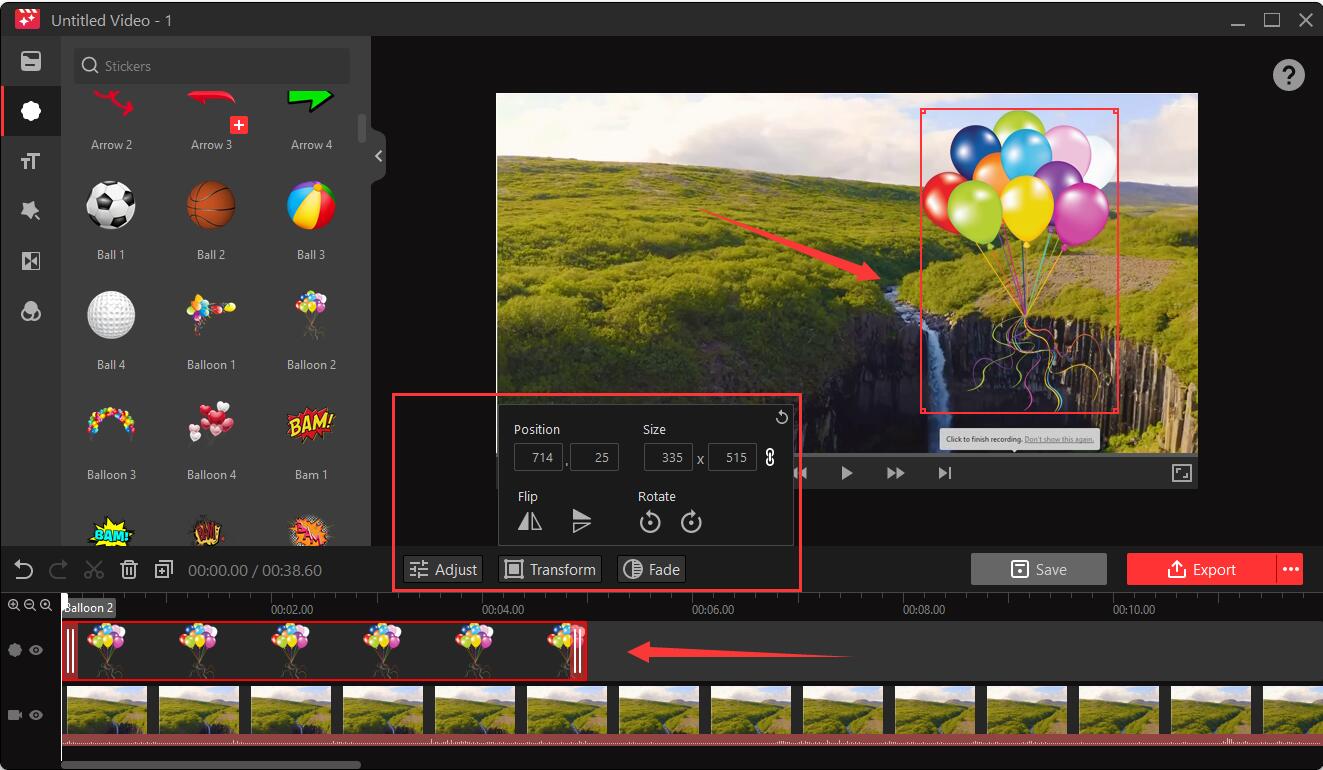
Note: You can adjust the size, position, duration, etc. of the added sticker as below:
How to add text to your videos?
1. Click the Text icon on the left panel.
2. Choose the text style you like and click (Add to timeline) to add it.
3. Edit the words and set their font, style, color, size, position, etc.
How to add effects to your videos?
1. Click the Effects icon on the left panel.
2. Choose the effects you like and click (Add to timeline) to add it.
Note: You can use the similar ways to add Transitions and Filters to your videos.
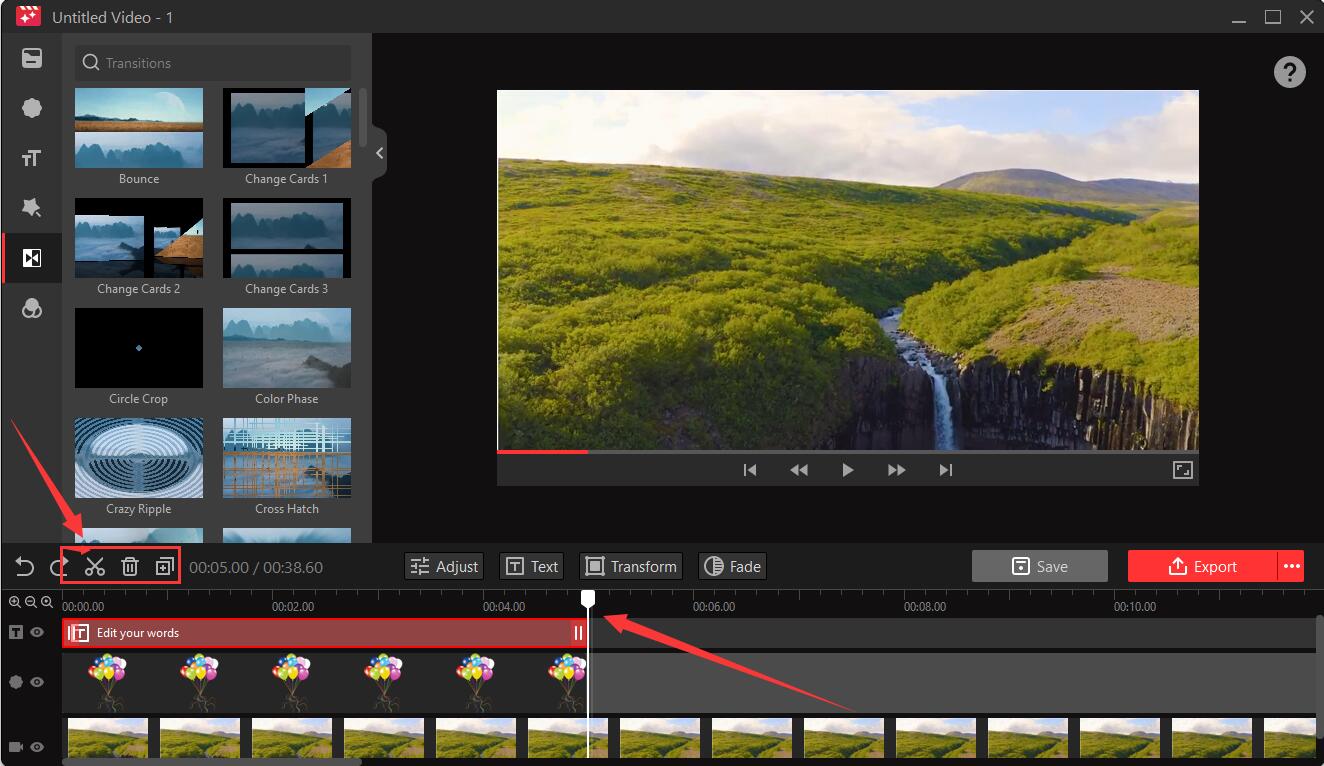
How to split the video and delete the unwanted parts?
To split a video, you need to select the clip in the timeline, and then move the scrubber to the position where you want to split, then click the scissor icon at the top left to split.
To delete the unwanted parts, please split them with the wanted parts first and then click the unwanted parts and click the Delete button to remove them.
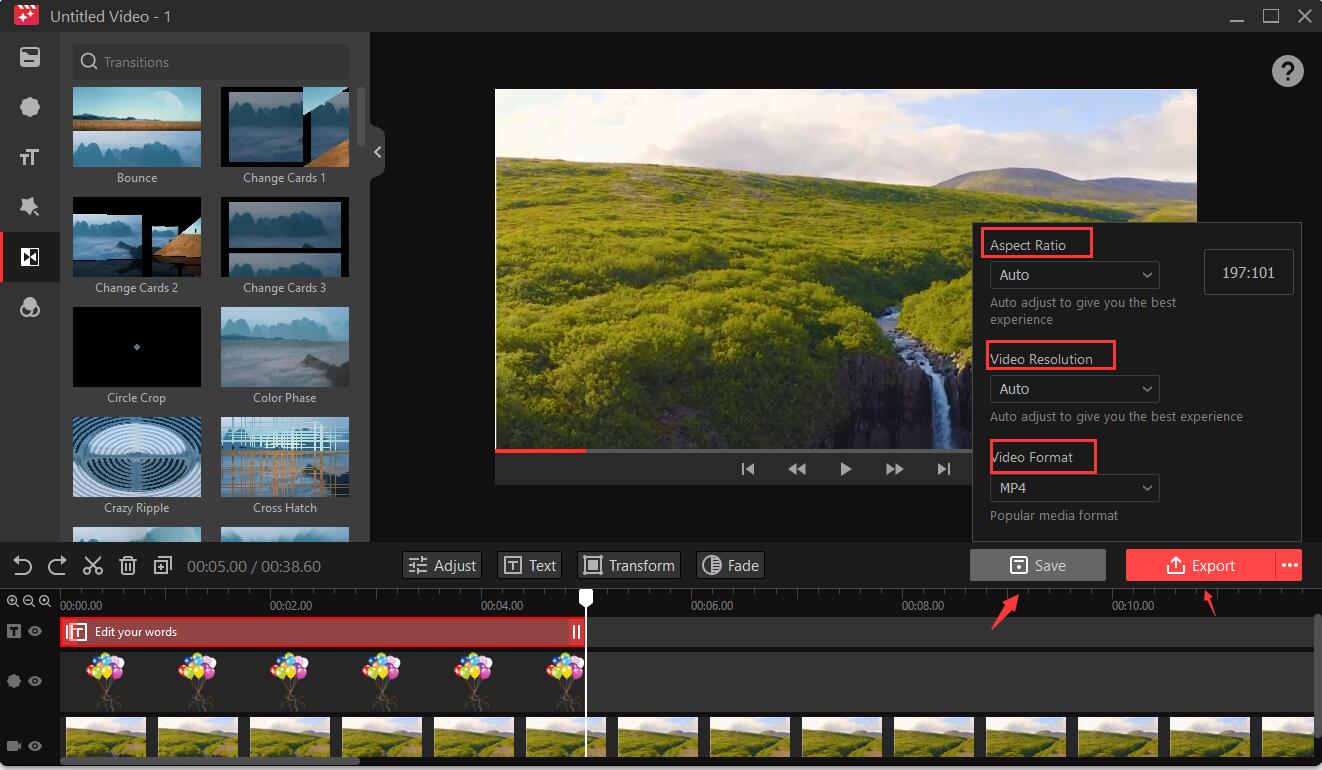
Step 5: Save or Export your edited videos.
You can click Save to save the edited video. Then you can see it in My Creations of the editor and edit it again when needed. Or you can click Export to export the edited video. Before export, you can set the Aspect Ratio, Video Resolution, and Video Format.
Compressor
The tool Compressor helps compress video files to a smaller size without losing quality.
Step 1: Click Tools in the main screen and click Compressor to open it.
Step 2: Click the Add icon or drag & drop the videos you want to compress.
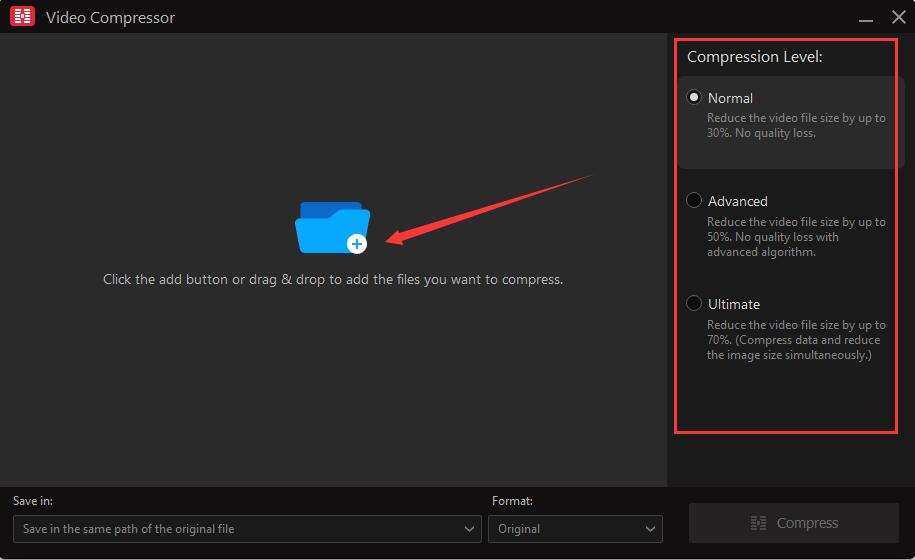
Step 3: Select the compress level as per your needs and click the Compress button to compress the video to smaller size.
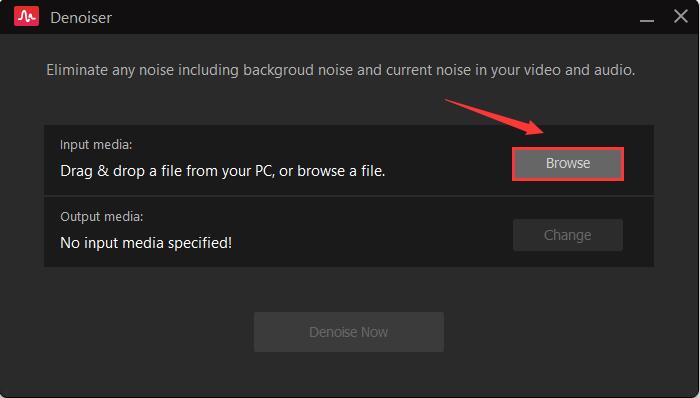
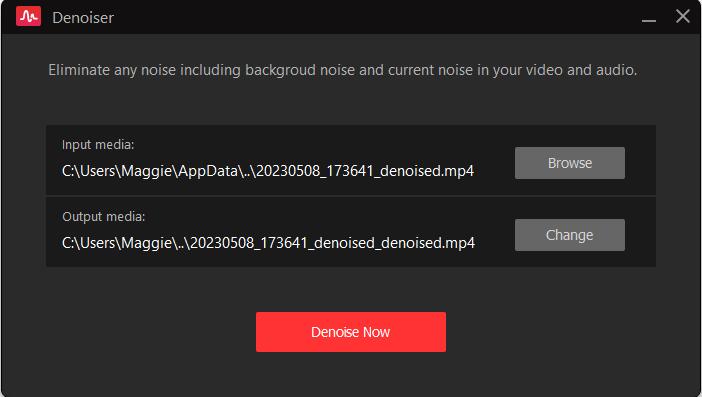
Denoiser
To bring you the best audio quality than ever, the Denoiser tool eliminates any noise including background noise and current noise in your video and audio.
Step 1: Click Tools in the main screen and click Denoiser.
Step 2: Click Browse or drag & drop the files you want to denoise.
Step 3: Click Denoise Now to denoise and improve the audio quality.
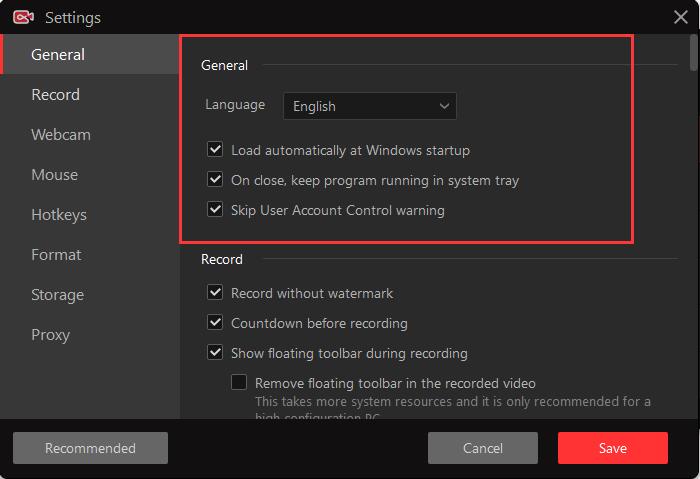
General Settings
Click the top left options icon  on the main screen and select Settings to open the settings for this program. You can configure each function as per your needs, and never forget to click Save to save the changes. Clicking Recommended can restore to default settings.
In general settings, you can set the program's display language, whether to skip the UAC, whether to load the program at Windows Startup, etc.
Record
Here you can set many recording related settings, including the directory to save the recorded videos, whether recording with watermark, countdown, etc., whether to show or hide toolbar, taskbar, and desktop icons, and some other record settings. Countdown, Floating Toolbar, and Watermark will be introduced with more details later.
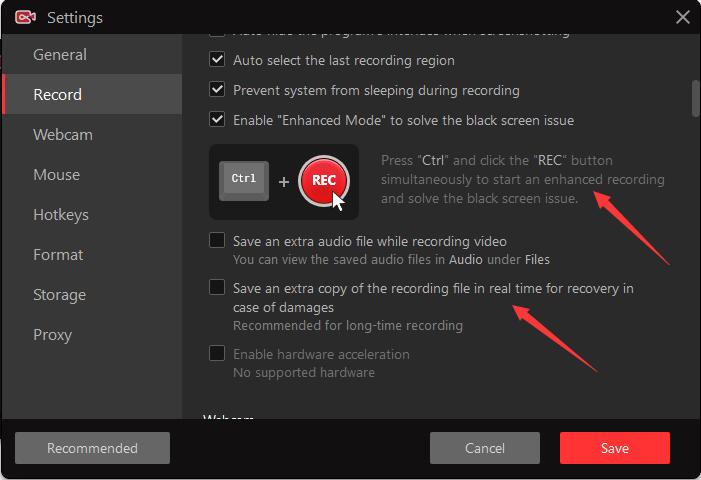
There are some advanced record settings to help you solve some headache recording issues:
If you encounter only audio recorded with black screen when you record video, please enable the Enhanced Mode here and then press Ctrl + REC when you record.
With the option "Save an extra copy of the recording file in real time for recovery in case of damages" ticked, you can restore files in case of damages including system crashes, insufficient space, or power failure.
Countdown
By default, there is a countdown timer of 3 seconds before the recording to notify you to be prepared for the recording. If you do not want the countdown, you can untick "Countdown before recording" under Record in Settings.

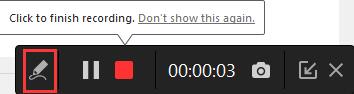
Floating Toolbar
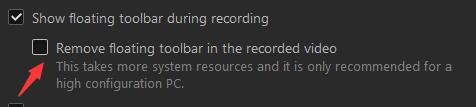
A floating toolbar as below will appear on the screen when the recording starts if you have "Show floating toolbar" enabled under Record in Settings. It provids you with various options including Pause, Done, and Doodle to allow you to pause/complete the recording or add doodles to your recording. If you do not want to see this floating toolbar, please tick "Remove floating toolbar in the recorded video" in the Settings.
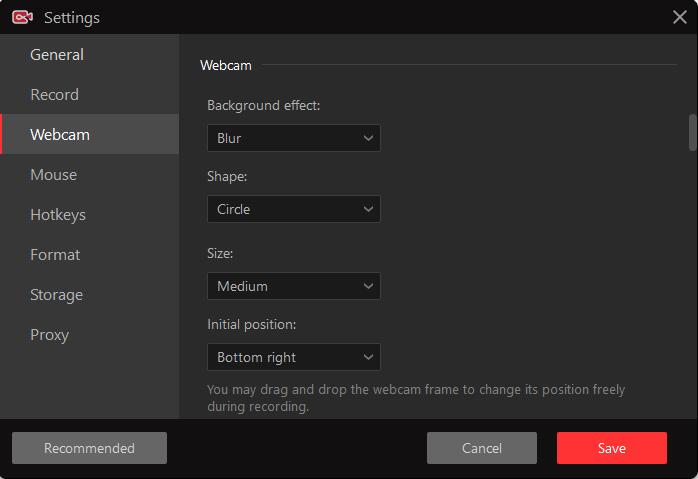
Webcam
iTop Screen Recorder also supports recording webcam overlay to your video, which brings you a better recording experience especially for recording gameplay or video conferences.
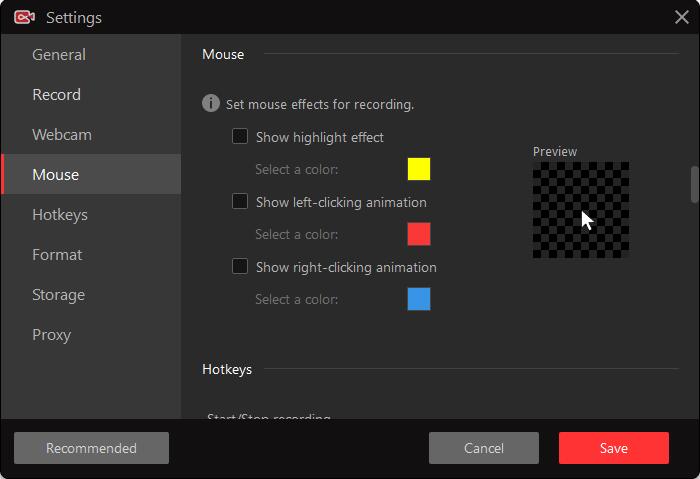
Mouse
Here you can set whether to record with mouse actions. You can also choose whether to add highlight effects and click animation and set the colors for them.
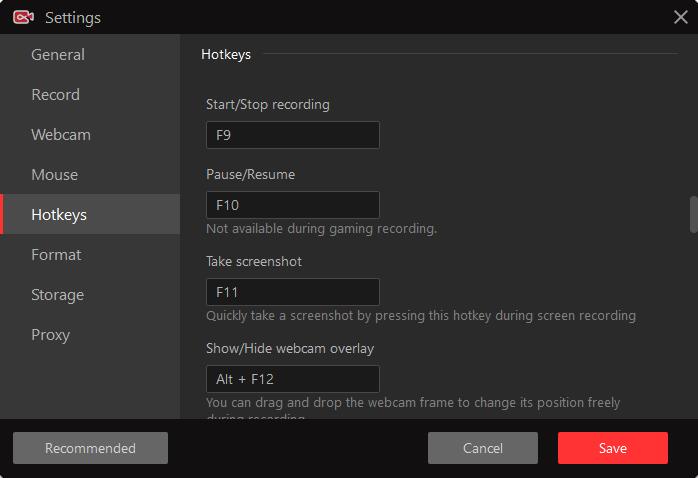
Hotkeys
For easier operations, iTop Screen Recorder provides hotkeys to operate the most frequently used functions. Although the program has already set default hotkeys, you can still change them according to your own preferences.
Note: Do not forget to click the Save button to save your changes.
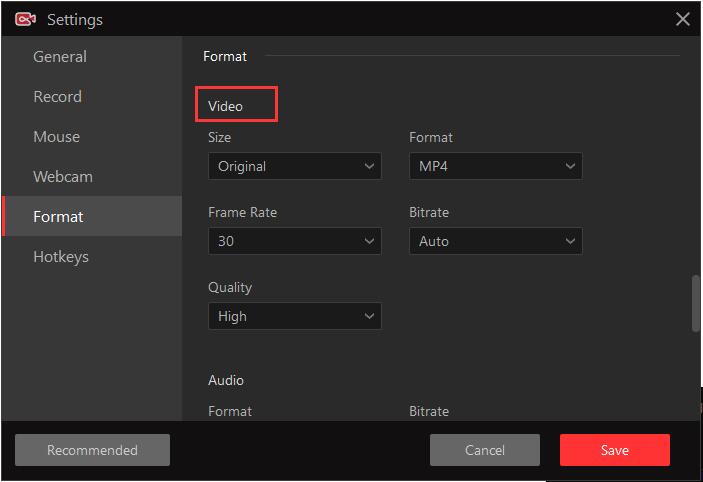
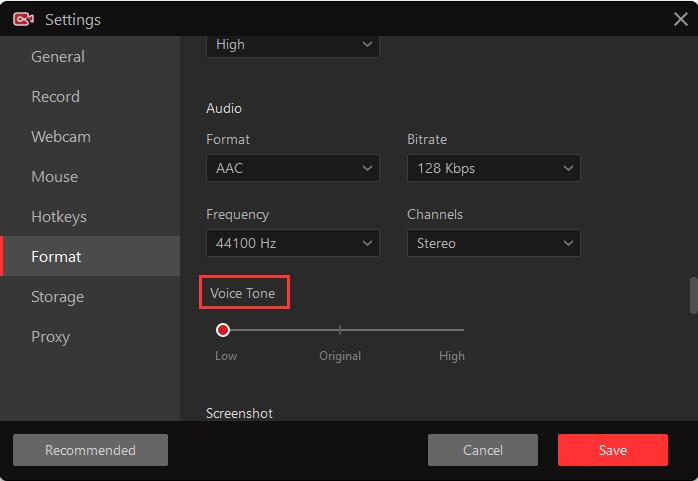
Format
Multiple output video formats (MP4, AVI, MKV, MOV, FLV, TS, GIF, etc.) and audio formats (MP3, AAC, AC3, FLAC, WMAV2, etc.) are available to you.
For video, it offers options for you to set Size, Format, Frame Rate, Bitrate, and Quality. For Audio, you can also set its Format, Bitrate, Frequency, and Channels here. And chane your Voice Tone.
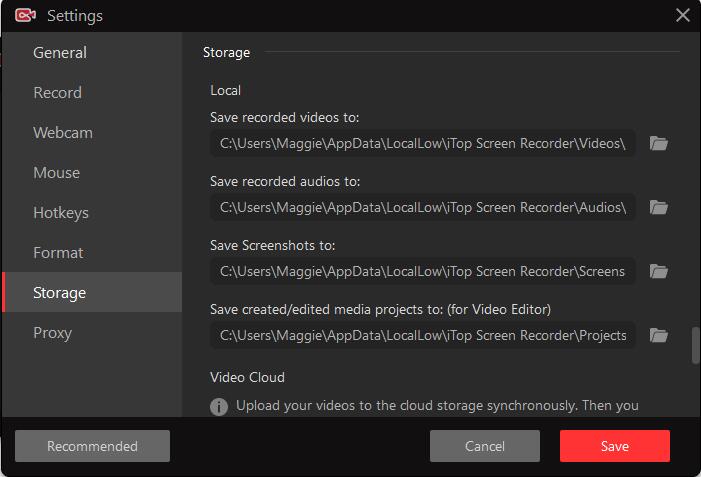
Storage
Here you can check the directory where you save your videos, audios, screenshots, and the edited videos (for Advanced Editor).
Proxy
Here you can check and customize your proxy. You can also set your update options here, too.

Technical Support
Every feedback from you is valued. To ensure you can reach us in time, we provide several feedback channels:
It's recommended to read our FAQs before looking in the other sections for help. Because sometimes, the questions have already been answered before you ask them here!
Online Feedback
If you can't find the answers on our FAQs page, please don't hesitate to contact us for email support. We will reply to you ASAP.Thank You
Thanks to all iTop Screen Recorder users and beta testers who help us to make this product better and better.
Thanks to the following volunteer translators who greatly help improve iTop Screen Recorder user experience and introduce it to more users worldwide:
lculator zaloom, Lyuben Panchev,Jan Szotkowski, Lars Wegge Andersen, Ernie Wong Lun Hing, Veikko Muurikainen, Chris Verberne, Roland LALIS, Hans-Juergen Koppatz, Stathis Doukas, Eli Ben David, Brechler Zsolt , Purwo Adi Nugroho, Claudio Birello, Nagai Tsuneo, JaeHyung Lee, Ole Sørensen, Mieczyslaw Grabowski, Igor Rückert, Fernando Santos , Cosmin Barna, SunPixel, Ilija Komljenović, Ilija Komljenović, dedko58, Marjan Mirai, Roberto Paiva, Annelie Pernheden, Dan Zhang, Alan, Kamil Bodur, Rid Destro.